The ultimate respect for a harvested animal is not just a quick, clean kill, but a masterful field-to-freezer process that utilizes every possible part and preserves the meat’s biochemical integrity.
- Success hinges on immediate and intelligent cooling, especially in temperatures above 70°F, where bacteria multiply exponentially.
- Maximizing yield and quality involves a “total utilization ethic,” turning bones, fat, and even sinew into valuable resources.
- Modern hunting demands strict CWD decontamination protocols to ensure the safety of your tools, your next harvest, and your family.
Recommendation: Adopt a “butcher’s mindset” in the field by focusing on systematic deconstruction, temperature control, and cross-contamination prevention as the cornerstones of an ethical harvest.
The moment after a successful shot is a mix of adrenaline, reverence, and responsibility. For the dedicated field-to-table hunter, this is where the real work begins—the craft of transforming a wild animal into clean, healthy sustenance. Many hunters know the basics of field dressing, but often fall back on rushed habits that can lead to spoilage, waste, and meat that tastes “gamey.” This isn’t just about avoiding dirt; it’s about managing biology, temperature, and time with the precision of a professional butcher.
The common advice to “gut it and cool it” barely scratches the surface. The true art lies in understanding the ‘why’ behind each step. It’s about recognizing that shot placement directly impacts meat quality through lactic acid buildup. It’s about knowing that the choice between a trophy buck and a mature doe has tangible consequences on herd health and the tenderness of your steaks. The goal is to move beyond simply salvaging a carcass and toward a systematic deconstruction that honors the animal by wasting nothing and preserving the superior quality of wild protein.
This guide abandons the old platitudes. Instead, it provides a detailed, professional framework for processing an entire animal in the field. We will explore the science of cooling, the ethics of herd management, critical safety protocols for CWD, and the subtle techniques that elevate your harvest from simple food to a premium, respectfully handled resource. This is the butcher’s approach to ensuring that every ounce of effort in the hunt is rewarded at the dinner table.
For those who prefer a visual walkthrough, the following video demonstrates the highly efficient “gutless method,” a cornerstone of modern backcountry processing that aligns perfectly with the principles of cleanliness and systematic deconstruction discussed here.
This article is structured to walk you through the entire process from a professional’s perspective, starting with why this effort is so worthwhile and moving through every critical stage of field butchery and preservation.
Summary: A Complete Guide to Professional Field Processing
- Why Wild Game Meat Is Superior to Store-Bought Organic Beef?
- How to Cool Down Meat Quickly When Temperatures Exceed 70°F?
- Trophy vs. Meat: Which Selection Criteria Benefits the Herd More?
- The Storage Mistake That Turns Premium Venison Gamey in the Freezer
- How to Utilize Bones and Hides to Minimize Field Waste?
- Why the “Behind the Shoulder” Shot Is Not Always the Ethical Choice?
- The Cleaning Error That Transfers CWD Prions to Your Next Hunt
- Fixed Blade or Replaceable Edge: Which Is Safer for Deep Backcountry Processing?
Why Wild Game Meat Is Superior to Store-Bought Organic Beef?
Before diving into the hard work of processing, it’s essential to understand what you’re protecting. Wild game isn’t just “free meat”; it’s a nutritionally superior protein that is nearly impossible to replicate through agriculture, even organic farming. The primary difference lies in the animal’s diet and lifestyle. An animal that forages on a wide variety of natural plants and travels miles every day develops a fundamentally different composition than one confined to a pasture.
Nutritionally, this translates to meat that is leaner, richer in key minerals, and has a healthier fat profile. For instance, wild game contains 2-3 times higher omega-3 fatty acids than even grass-fed beef, a direct result of its diverse, natural diet. These healthy fats are crucial for cardiovascular and cognitive health. Furthermore, wild game is an excellent source of iron and essential B vitamins, which are vital for energy production. The complete absence of antibiotics and growth hormones is a guarantee, not a premium feature you pay extra for.
A detailed European nutritional analysis of wild game, including deer and wild boar, confirms these benefits. It highlights a consistently low fat content (under 3%) and a high protein content (up to 26%) across various species. This lean profile makes it a powerful, nutrient-dense food. Protecting this incredible resource from the moment of harvest is the first step in honoring the animal and nourishing your family with the best protein nature can provide.
How to Cool Down Meat Quickly When Temperatures Exceed 70°F?
Heat is the number one enemy of meat quality. In any temperature above 40°F (4°C), bacteria begin to multiply, but the real “danger zone” starts at 70°F (21°C). At these temperatures, the clock is ticking loudly. According to the FDA Food Code, some bacteria can double every 20 minutes in this temperature range. This bacterial action is what causes spoilage and the sour, “gamey” taste many people associate with venison. Your first priority, above all else, is to drop the carcass temperature as quickly as possible.
The most effective strategy is to increase the meat’s surface area to encourage airflow and evaporative cooling. This is where the “gutless method” shines, as it allows you to remove the four quarters, backstraps, and tenderloins without opening the gut cavity, keeping the meat cleaner and allowing it to cool immediately. Once quartered, the meat should be placed in high-quality, breathable game bags. These bags protect the meat from flies and debris while allowing moisture to escape.
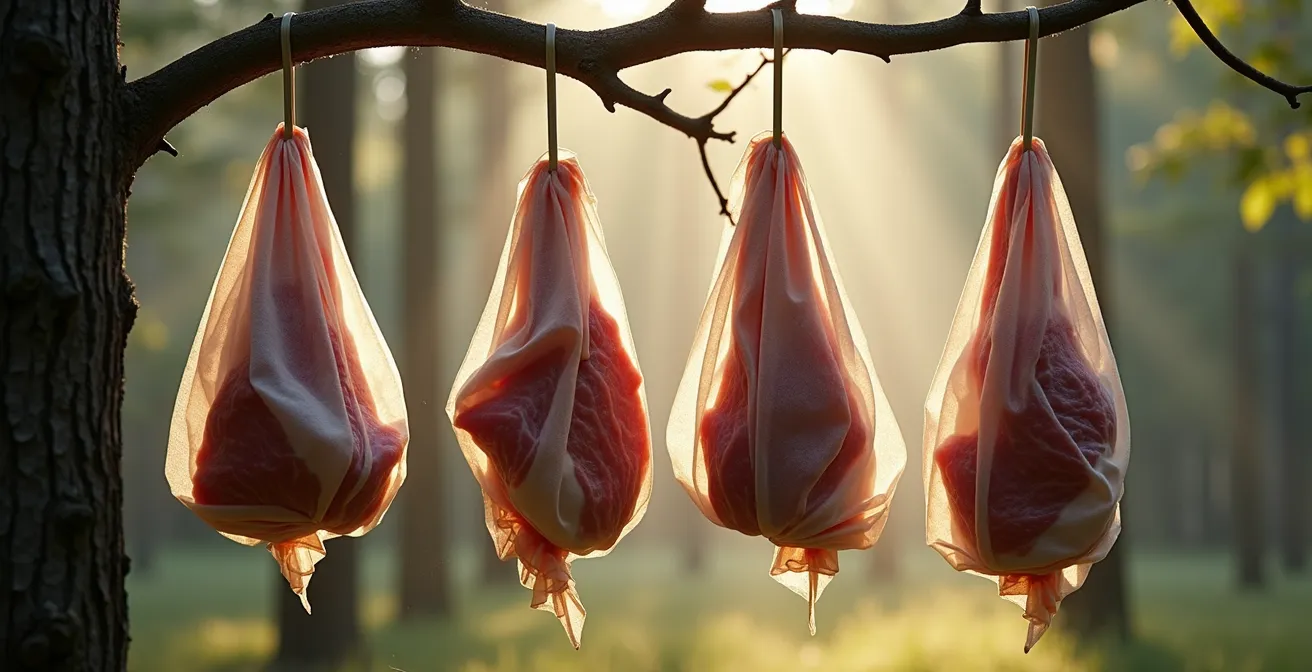
As the illustration shows, hanging the quarters is critical. Find a cool, shaded area with good airflow—a north-facing slope is ideal. Use sticks to prop open the game bags and ensure there is at least a 6-inch gap between each quarter to allow air to circulate freely on all sides. If you have access to a clean, cool stream, you can submerge the meat for 30-45 minutes for an initial thermal shock, but only if it’s double-bagged in sturdy, waterproof plastic to prevent contamination. The goal is to get the meat cool to the touch as rapidly as circumstances allow.
Trophy vs. Meat: Which Selection Criteria Benefits the Herd More?
The work of a field-to-table hunter begins before the shot is even taken. The decision of which animal to harvest has a direct impact on the health of the herd and, consequently, the quality of future hunting opportunities. While the image of a massive-antlered buck is powerful, a “trophy-only” mindset can sometimes be detrimental to long-term herd management. Removing the prime, dominant breeder can disrupt the social hierarchy and breeding cycle.
From a purely ecological and meat-focused perspective, the most ethical choice often involves selecting animals that contribute less to the breeding population’s future. This typically means older does that are past their reproductive prime or surplus young males. This approach helps balance the buck-to-doe ratio and ensures the strongest, healthiest males continue to pass on their genes. As the Wildlife Management Institute often notes, culling non-productive animals is a cornerstone of sound adaptive harvest management.
The practical differences in processing are also significant. A younger animal or a doe will generally yield more tender meat with less connective tissue, requiring less work during butchering. The table below outlines the key trade-offs between selecting for trophy characteristics versus selecting for meat and herd balance.
| Selection Criteria | Trophy (Mature Buck) | Meat (Young/Female) |
|---|---|---|
| Meat Yield | 150-200 lbs | 80-120 lbs |
| Tenderness | Tougher, more connective tissue | More tender, less work to process |
| Herd Impact | Removes dominant breeder | Maintains breeding population |
| Processing Time | 4-6 hours | 2-3 hours |
| Population Management | May disrupt breeding hierarchy | Balances doe/buck ratio |
Ultimately, the choice is personal and depends on your management goals. However, a hunter focused on providing the best possible meat for their family should recognize that the “best” animal for the freezer is not always the one with the largest antlers.
The Storage Mistake That Turns Premium Venison Gamey in the Freezer
You can do everything right in the field—a perfect shot, rapid cooling, clean quartering—only to ruin the meat months later with one simple mistake: improper freezer packaging. The characteristic “freezer taste” or “gamey” flavor that many people complain about is often not from the animal itself, but from a chemical process called lipid oxidation. This occurs when fat molecules are exposed to oxygen, even at freezing temperatures, causing them to go rancid.
The primary culprit is air. Any air trapped in the package with your meat is an enemy. This is why simply throwing cuts into a zipper-lock bag is a recipe for failure. A study on venison storage confirmed that meat with even microscopic air pockets showed significantly higher rancidity markers after just six months. The research highlights a critical error: packaging meat that is not completely dry. A wet surface prevents a strong seal, allows ice crystals to form, and creates tiny air channels that accelerate spoilage.
The solution is a meticulous, multi-layered wrapping process designed to create an airtight barrier. Vacuum sealers are the gold standard, but a careful double-wrap using quality freezer paper and tape can be nearly as effective if done correctly. The key is to force out every bit of air as you wrap. Always label each package with the cut and date, ensuring you use the oldest meat first. Following a strict pre-freezing protocol is the final step in guaranteeing the field-to-table quality you worked so hard to achieve.
Your Pre-Freezing Quality Control Checklist
- Surface Dryness: Pat every piece of meat completely dry with paper towels. A dry surface is essential for a proper seal.
- Silver Skin Removal: Trim away all visible silver skin and heavy fascia. This connective tissue oxidizes faster than muscle and can contribute to off-flavors.
- Airtight Packaging: Double-wrap the meat tightly in plastic wrap and then in butcher/freezer paper, or use a quality vacuum sealer for maximum protection.
- Clear Labeling: Use a freezer-safe marker to label each package with the specific cut (e.g., “Venison Backstrap”) and the date of harvest.
- Flash Freezing: Freeze the packages in a single flat layer first. Once they are frozen solid, you can stack them to save space without compromising their shape and seal.
How to Utilize Bones and Hides to Minimize Field Waste?
A true field-to-table ethic means embracing “total utilization”—finding value and purpose in every part of the animal, not just the prime cuts of muscle. This philosophy of respect means looking at bones, fat, and hide not as waste products, but as valuable resources. With a little extra effort in the field or back at camp, you can significantly reduce waste and add incredible new dimensions to your wild game experience.
The skeleton is a prime example. The large leg bones (femurs, humeri) and the pelvis are packed with marrow and collagen. When roasted and simmered for hours, they create a rich, nutrient-dense bone broth that is the perfect base for soups, stews, and sauces. Smaller bones and trim can be added to the stockpot as well. The fat, particularly the hard, waxy suet found around the kidneys and body cavity, can be rendered into tallow. This process involves slowly heating the fat until it liquefies, then straining it. The result is a stable, flavorful cooking fat ideal for searing steaks or even making soaps and candles.
Even the tough, silvery connective tissues have a purpose. The long tendons running along the backstrap, known as sinew, are incredibly strong. Historically, they were dried and processed into thread for sewing or used to make bowstrings. While this is an advanced skill, simply collecting these resources is the first step. The hide itself can be professionally tanned into beautiful leather or a hair-on rug, a lasting tribute to the animal. A commitment to total utilization transforms the act of processing from a chore into a deeper, more meaningful connection to the harvest.
Why the “Behind the Shoulder” Shot Is Not Always the Ethical Choice?
The classic “behind the shoulder” shot, targeting the heart and lungs, has long been taught as the gold standard for an ethical kill. It offers a large vital zone and typically results in a quick death with a good blood trail. From a purely terminal ballistics standpoint, it’s a reliable choice. However, from a butcher’s perspective—one focused on preserving the biochemical integrity of the meat—it has potential downsides that are rarely discussed.
When an animal is shot, its body is flooded with adrenaline. If the animal runs a significant distance before expiring, its muscles become depleted of glycogen and saturated with lactic acid. This process can alter the meat’s pH, resulting in a tougher texture and a stronger, more “gamey” flavor. A heart/lung shot, while fatal, doesn’t always result in an instantaneous drop. The animal may run 50 to 100 yards or more. Research into the biochemical impact of extended tracking shows that animals requiring over 30 minutes to recover have demonstrably higher levels of acid in their muscles, directly linking shot placement to final meat quality.
An alternative, the high shoulder shot, targets the spine and brachial plexus. This shot anchors the animal instantly, preventing any adrenaline-fueled run and preserving the muscle’s resting state. The trade-off? Meat loss. While a heart/lung shot may damage 2-3 pounds of rib meat, field studies demonstrate that high shoulder shots can destroy 8-12 pounds of prime shoulder meat. The “ethical” choice, therefore, becomes a complex calculation: is it a quick kill with more meat damage, or a slightly slower kill with less meat damage but potentially tougher final product? For the backcountry hunter facing a long pack-out, anchoring the animal on the spot may be the most responsible choice for both recovery and meat preservation.
Key Takeaways
- Immediate cooling is the single most important factor in preventing spoilage and preserving meat quality.
- A “total utilization” mindset honors the animal by finding a use for bones (broth), fat (tallow), and hide.
- Strict tool decontamination is non-negotiable in areas with Chronic Wasting Disease (CWD) to prevent prion transfer.
The Cleaning Error That Transfers CWD Prions to Your Next Hunt
In the modern hunting landscape, Chronic Wasting Disease (CWD) is a serious and growing concern. CWD is a fatal neurological disease caused by abnormal proteins called prions. These prions are incredibly resilient and can persist in the environment and on equipment for years. The single biggest cleaning error a hunter can make is using the same tools without proper decontamination between animals or even between different parts of the same animal, creating a contamination vector that can spread the disease.
Prions concentrate in specific parts of an animal, particularly the brain, spinal cord, lymph nodes, and spleen. When you use a knife to cut through the spinal column or near lymph nodes in the neck and then use that same uncleaned blade to quarter the hind legs, you are potentially transferring prions directly onto prime cuts of meat. This cross-contamination risk is why a methodical, two-tool system is highly recommended by wildlife agencies.
You should designate one “dirty” knife for high-risk tasks like removing the head or cutting around the spine. A separate, “clean” set of tools should be used for all other deboning and meat processing. After every hunt, and especially if processing multiple animals, all tools must be rigorously decontaminated. Simple soap and water are not enough to destroy prions. The most accessible and effective method is to soak tools for a minimum of five minutes in a 40% household bleach solution (two parts bleach to three parts water). This step is not optional; it is a critical responsibility for every modern hunter to help prevent the spread of CWD.
| Tissue Type | Risk Level | Location | Avoidance Strategy |
|---|---|---|---|
| Brain/Spinal Cord | Highest | Skull cavity, vertebral column | Never cut through the spine or skull |
| Lymph Nodes | High | Neck, groin, internal organs | Cut wide around these areas; avoid rupturing |
| Spleen | High | Left side near stomach | Remove intact with organs without cutting |
| Tonsils | Moderate | Back of throat | Avoid harvesting head/neck meat in a CWD area |
| Eyes | Moderate | Orbital cavity | Avoid contact during caping |
Fixed Blade or Replaceable Edge: Which Is Safer for Deep Backcountry Processing?
The debate between a traditional fixed-blade knife and a modern replaceable-edge knife is a common one at hunting camp. Both have distinct advantages, but when considering safety during a full-animal breakdown deep in the backcountry, the context changes. Here, fatigue, grip, and the type of task at hand are the deciding factors. There is no single “best” knife; there is only the best tool for a specific job.
A robust, full-tang fixed-blade knife is unparalleled for heavy work. When you need to disjoint a leg at the hip socket, split a sternum, or cut through thick hide and cartilage, you need leverage and a handle you can grip securely, even when it’s slick with fat. The risk with a fixed blade comes from dulling. As the edge loses its sharpness, you apply more pressure, increasing the chance of a slip that can lead to a serious injury far from help. This requires the user to have the skill and discipline to stop and sharpen the blade in the field.
On the other hand, replaceable-edge knives offer surgical sharpness every time you snap on a new blade. They excel at fine, detailed work like caping a trophy or removing silver skin. Their primary safety risk lies in the blade’s inherent weakness under torque. Attempting to use one to pry a joint apart can easily snap the blade, sending a razor-sharp fragment flying. Their smaller, often less-ergonomic handles can also become slippery and difficult to control during heavy processing.
For this reason, many professional butchers and experienced hunters don’t see it as an “either/or” choice. As Seth McGinn of the Bearded Butchers wisely points out in their professional guide:
For entire animal processing, the professional choice isn’t ‘or’ but ‘and’. Use a robust fixed blade for heavy work like splitting sternum or disjointing legs, and a scalpel-like replaceable for delicate caping tasks.
– Seth McGinn, The Bearded Butchers Professional Processing Guide
Adopting a two-knife system provides the safest and most efficient solution, allowing you to match the tool’s strength to the specific demands of each step in the systematic deconstruction of the animal.
By mastering these principles—from the field to the freezer—you are not just processing an animal; you are honoring its life by ensuring nothing is wasted and that the final product is of the highest possible quality. To put this knowledge into practice, the next logical step is to assemble and refine your field processing kit to match this professional approach.