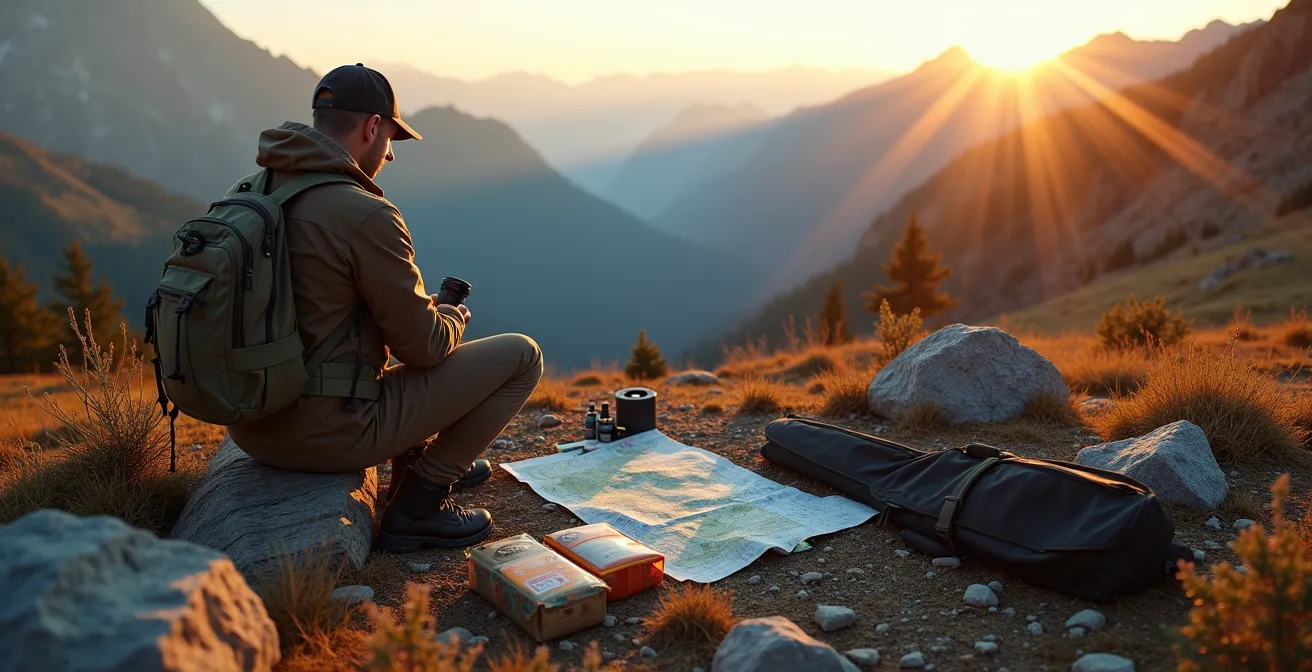
A successful backcountry hunt is determined by mastering the pre- and post-hunt logistics, not just by your skill in the field.
- Your insurance strategy must distinguish between medical care and physical evacuation from the point of injury; they are not the same.
- Transporting firearms and game meat requires navigating a complex matrix of federal, airline, and state regulations where a single misstep can end your trip.
Recommendation: Adopt a professional’s ‘contingency mindset’ by building robust logistical armor around your trip, focusing on what happens before you fly and after you pull the trigger.
The dream of a remote backcountry hunt—the vast, silent landscapes of Alaska or the Rockies, the physical and mental challenge, the pursuit of a truly wild animal—is a powerful motivator. Most aspiring hunters focus on marksmanship, physical fitness, and scouting. They imagine the climax of the hunt, but they dangerously overlook the complex web of logistics that underpins the entire expedition. This is a critical error. A successful multi-day hunt in a remote wilderness is not a simple vacation; it’s a small-scale military operation where failure often occurs far from the mountain, in an airport terminal, a government office, or a processing facility.
The common advice to “get in shape” and “pack the right gear” is dangerously incomplete. It ignores the brutal realities of what can go wrong. A broken leg is a minor inconvenience in the suburbs, but a life-threatening catastrophe at 10,000 feet. A trophy bull is a moment of triumph, but 500 pounds of meat becomes a logistical nightmare 2,000 miles from home. The true measure of a hunter’s preparation is not their gear list, but their logistical armor—a comprehensive system of insurance, legal compliance, and contingency planning.
But what if the key to success wasn’t just about avoiding mistakes, but about proactively mastering the domains most hunters ignore? This guide is built on that premise. We will move beyond the basics of gear and fitness to dissect the critical logistical pillars that determine success or failure. This is about building a contingency mindset that transforms you from a hopeful tourist into a self-reliant expeditionary hunter.
This article provides a detailed framework for building that resilience. We will dissect the nuances of specialized insurance, the legal maze of air travel with firearms, the science of hunt-specific training, and the complex challenge of getting your harvest home safely. Read on to fortify your plan against the most common points of failure.
Summary: A Professional’s Guide to Backcountry Hunt Logistics
- Medevac vs. Trip Cancellation: Which Insurance Covers a Broken Leg on a Mountain?
- How to Fly with Firearms Without Getting Detained by TSA?
- Cardio vs. Rucking: Which Training Prepares You for Elk Mountains?
- How to Get 500 lbs of Meat Home from 2000 Miles Away?
- The Question You Must Ask a Guide Before Booking a Deposit
- When to Check for Regulation Updates to Avoid Fines on Opening Day?
- Why Wild Game Meat Is Superior to Store-Bought Organic Beef?
- Public Land or Private Ranch: Which Destination Fits Your Skill Level?
Medevac vs. Trip Cancellation: Which Insurance Covers a Broken Leg on a Mountain?
The most dangerous gap in a hunter’s planning is misunderstanding insurance. Standard travel insurance is designed for canceled flights and lost luggage in Paris, not for a helicopter extraction from a remote Alaskan basin. A critical injury in the backcountry initiates a sequence of events, each requiring a different type of coverage. Relying on a single, generic policy is the financial equivalent of hunting grizzly with a .22. You need a layered system of logistical armor.
The first layer is medical evacuation (medevac) coverage. This is not medical insurance. Its sole purpose is to get you from the point of injury to a hospital. Without it, you are personally liable for the extraction costs. According to Global Rescue, a leading provider in the field, a medical evacuation can cost up to $300,000 out of pocket. Specialized providers like Ripcord have demonstrated their value in extreme scenarios, evacuating an injured hunter from a remote African village using a private jet and armed security, a feat far beyond the scope of traditional insurers.
The second layer is travel medical insurance, which covers your hospital bills once you arrive. Your domestic health plan may offer little to no coverage out-of-state or internationally. The third layer, trip cancellation insurance, protects your non-refundable deposits for guides, tags, and flights. Finally, review your homeowner’s policy for gear coverage, as high-value optics and firearms may require a separate rider. This multi-layered approach is the only way to build a truly resilient financial safety net.
Your 5-Point Insurance Audit Checklist
- Rescue Coverage: Secure a dedicated rescue/evacuation membership (e.g., Global Rescue). Verify it covers your specific hunting location and activities without a “high-risk” exclusion.
- Medical Treatment: Confirm your health insurance or a separate travel medical policy covers hospital care in the state or country of your hunt. Check out-of-network limits.
- Investment Protection: Calculate your total non-refundable costs (guides, tags, flights). Purchase trip cancellation insurance to cover this amount if the financial risk is significant.
- Gear Security: Contact your homeowner’s or renter’s insurance agent. List your high-value gear (rifle, optics, electronics) and ask if a separate “personal articles floater” policy is needed for full replacement value against theft or damage.
- Exclusion Review: Read the fine print on all policies. Specifically search for exclusions related to hunting, use of firearms, specific altitudes, or non-commercial aircraft (e.g., bush planes), and confirm your hunt is not voided.
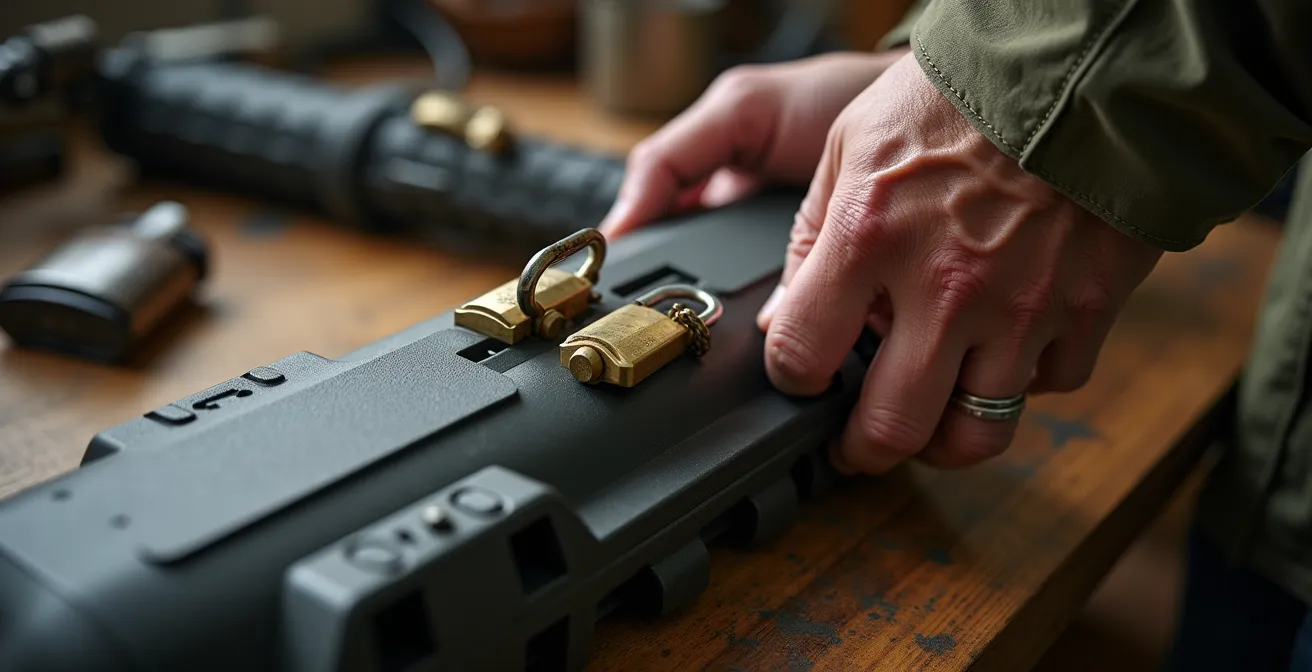
How to Fly with Firearms Without Getting Detained by TSA?
Successfully navigating airport security with a firearm is a test of attention to detail. It is a non-negotiable, zero-tolerance environment where a minor oversight can lead to confiscation, missed flights, and severe legal penalties. In 2024 alone, the TSA intercepted a record 6,678 firearms at checkpoints, the vast majority of which were loaded. This highlights a widespread misunderstanding of the rules. Your responsibility is to know and comply with two separate sets of regulations: the federal TSA rules and your specific airline’s policies, which are often stricter.
The foundational TSA requirements are clear: firearms must be unloaded and packed in a locked, hard-sided container as checked baggage. Ammunition must be stored separately in a secure box. You must declare the firearm to the airline agent at the check-in counter. However, this is only the starting point. Where hunters fail is in not researching the airline-specific overlays. For example, while the TSA allows any lock to which you hold the key, some airlines demand multiple non-TSA locks. While the TSA has broad ammunition guidelines, airlines frequently impose strict weight limits, often around 11 pounds.
This image demonstrates the first step in building your logistical armor for travel: securing your unloaded rifle in a robust, airline-compliant hard case with high-quality, non-TSA locks.
The process is further complicated by multi-leg journeys. If you switch carriers, you will likely need to claim your firearm and re-check it, repeating the entire declaration process. The only way to ensure a smooth transit is to print out and carry the firearm policies for both the TSA and every airline on your itinerary. This documentation becomes your proof of compliance if you encounter an uninformed agent. Failing to do this preparation is gambling with your entire hunt.
To avoid any confusion at the check-in counter, it is vital to understand how federal and airline-specific rules differ. The following table breaks down the key areas where you must verify both sets of policies.
| Requirement | TSA Federal Rules | Typical Airline Add-ons |
|---|---|---|
| Case Type | Hard-sided, completely locked | May require specific brands (Pelican), non-TSA locks only |
| Ammunition | Securely packaged, .75 caliber or less | Weight limits (often 11 lbs), original packaging preferred |
| Declaration | Required at check-in | May require additional forms, early arrival (2+ hours) |
| Multi-leg Journeys | Same rules apply | Must re-check firearms when switching carriers |
| Lock Requirements | Any lock acceptable, you keep key | May require multiple locks on case |
Cardio vs. Rucking: Which Training Prepares You for Elk Mountains?
Physical preparation for a mountain hunt is a common point of failure, but not for the reasons most people think. Many hunters train for the wrong event. They log miles on a treadmill, focusing on aerobic cardio, preparing their heart and lungs for a 10K race. But a backcountry hunt is not a race. It is a multi-day test of strength endurance under load, punctuated by periods of intense exertion, all performed in a state of caloric deficit and sleep deprivation. The true physical challenge isn’t chasing the elk up the mountain; it’s packing 100+ pounds of meat and gear back down it. This is where rucking (hiking with a weighted pack) and strength training become non-negotiable.
Your training must simulate the specific demands of the environment. Pure cardiovascular fitness is the foundation, but it is insufficient. You need to build metabolic currency through a periodized program that progresses from a base aerobic phase to max strength and finally to strength endurance. This involves a heavy emphasis on weighted exercises like squats, deadlifts, and, most importantly, loaded step-ups and step-downs. Eccentric movements (the “down” phase of a lift) are particularly crucial for building durability in your knees and quads to handle steep, heavy descents.
As legendary public land hunter Randy Newberg emphasizes, functional fitness is paramount. His success at an advanced age is built on a philosophy of loaded carries and deliberate discomfort training, not on maximizing his run time. He understands that the hunt is won or lost based on your ability to perform after days of accumulated fatigue. A critical, and often overlooked, component is practicing “recovery deficit” training—scheduling hard, back-to-back training days on limited sleep to teach your body and mind to function under the exact conditions you’ll face on the mountain. Your body must be an asset, not the primary point of failure.
- Phase 1 (Months 1-2): Base Aerobic. Build your foundation with 3-4 weekly hikes or trail runs, starting at 60 minutes and increasing duration or intensity by 10% each week.
- Phase 2 (Month 3): Max Strength. Introduce 2-3 days of heavy lifting. Focus on compound movements: squats, deadlifts, and overhead presses with loads in the 70-85% of your one-rep max range.
- Phase 3 (Months 4-5): Strength Endurance & Rucking. This is the most critical phase. Begin rucking with a 20lb pack, gradually increasing to 60lbs or more over 8 weeks. Combine this with strength training that uses higher repetitions and eccentric focus, like weighted step-downs.
- Phase 4 (Final 2 weeks): Taper. Reduce your training volume by at least 40% while maintaining intensity with short, sharp workouts. Focus on mobility, stretching, and full recovery before your trip.
How to Get 500 lbs of Meat Home from 2000 Miles Away?
The moment of a successful harvest is immediately followed by a daunting logistical challenge: preserving and transporting hundreds of pounds of meat across the country. This is where many hunters fail, losing the most valuable prize of the hunt to spoilage. Achieving cold chain sovereignty—maintaining absolute control over your meat’s temperature from the field to your freezer—is a complex task with four primary solutions, each with its own trade-offs in cost, time, and risk.
The first option is flying with the meat in checked coolers. This is the fastest method but is constrained by airline rules. Most airlines cap cooler weight at 50 pounds and have strict regulations on the type of ice permitted (dry ice is often allowed in limited quantities, but gel packs or frozen water are safer bets). This method can quickly become expensive with excess baggage fees. The second option is driving the meat home yourself. This gives you complete control over the cold chain but is incredibly time-intensive and requires a significant investment in high-quality coolers and a constant supply of ice.
The third and often most practical option is to use a local game processor near your hunt area. They can professionally cut, wrap, and flash-freeze your meat, then ship it to you via refrigerated freight. This outsources the most difficult part of the process but requires pre-hunt research to identify and vet a reputable processor. The final, and most expensive, option is to handle the initial processing yourself and then ship the frozen, boxed meat via an overnight carrier like FedEx. While this offers door-to-door service, the cost can be prohibitive for a large animal. Your choice will depend on a careful calculation of your budget, timeline, and tolerance for risk.
Regardless of your chosen transport method, strict temperature control is paramount. This table provides a cost-benefit analysis to help you make an informed decision before your hunt.
| Method | Cost for 200 lbs | Time | Pros | Cons |
|---|---|---|---|---|
| Flying (checked coolers) | $400-600 baggage fees | Same day | Fastest option | 50lb weight limits, ice restrictions |
| Driving with coolers | $300-500 fuel + ice | 2-4 days | Full control of cold chain | Time intensive, vehicle wear |
| Processor freight shipping | $500-800 | 3-5 days | Professional handling | Must find processor, trust required |
| Overnight shipping (FedEx) | $1,200-2,000 | 1-2 days | Door-to-door service | Most expensive option |
The Question You Must Ask a Guide Before Booking a Deposit
Hiring an outfitter can seem like a shortcut to success, outsourcing the immense logistical burden of a backcountry hunt. However, placing a deposit without rigorous vetting is a huge financial gamble. The quality and integrity of guides vary wildly, and a glossy website is no guarantee of a well-run operation. The most important part of your vetting process is to move beyond the highlight reel of trophy photos and adopt a contingency mindset. You must probe for how the outfitter handles adversity. The single most important question you can ask is: “What is your contingency plan when things go wrong?”
A professional outfitter will have immediate, specific answers. Ask for concrete examples of how they’ve handled past client injuries, extreme weather events that blocked access, or vehicle breakdowns. Their response will reveal their level of experience and preparedness. A vague answer is a major red flag. This line of questioning should extend to all aspects of the hunt. What happens if you tag out on the first day of a seven-day hunt? Will you be relegated to camp, or do they have plans for fishing or small game hunting? What is their policy on wounded and unrecovered animals?
This conversation, where you and a potential guide discuss plans and contingencies, is the most crucial part of the booking process. It’s where trust is built and expectations are aligned.

Another powerful vetting tool is to ask for references from unsuccessful clients who still had a positive experience. Anyone can be happy after a successful harvest. A client who did not fill their tag but still recommends the outfitter provides the most honest testament to the quality of the operation itself—the food, the camp, the guide’s effort, and the overall experience. This focus on process over outcome is the mark of a true professional.
Here are the critical questions every hunter must ask before sending a deposit:
- What is your contingency plan for injuries, severe weather, or access issues? (Request specific past examples).
- If I tag out on Day 1 of a 7-day hunt, what happens for the remaining 6 days?
- What is your policy on wounded animals that are not recovered?
- Can you provide references from 1-2 unsuccessful clients who still recommend your service?
- What specific gear do you provide versus what I must bring? (Clarify game bags, water filters, and emergency communication devices).
- Do you carry liability and evacuation insurance for your clients, and what are its limits?
When to Check for Regulation Updates to Avoid Fines on Opening Day?
“I didn’t know” is not a defense in the eyes of a game warden. Hunting regulations are complex, vary dramatically by state and even by specific management unit, and are subject to last-minute changes. A simple mistake—misunderstanding the legal shooting hours, improperly tagging a carcass, or failing to leave evidence of sex attached—can result in hefty fines, license suspension, and confiscation of your firearm and animal. Fines for hunting regulation violations can reach up to $15,000 in some jurisdictions. Therefore, regulatory discipline is not a one-time task but a continuous, multi-stage process.
Your verification timeline should begin long before the hunt. The first phase occurs 6-12 months out, during the application process, where you’ll check basic season dates and unit boundaries to inform your strategy. The second, more intensive phase happens about one month before your hunt. At this point, you must download the final, official regulations booklet for your specific state and unit. Do not rely on third-party websites or forum chatter. Read the booklet cover to cover, paying special attention to gray areas like the definition of a “loaded” firearm in a vehicle, carcass transport requirements, and specific CWD testing protocols if applicable.
The final, and most frequently neglected, phase of verification happens in the 24 hours leading up to your hunt. You must check the state’s fish and wildlife department website for any emergency closures or updates. These can be issued for a variety of reasons, including wildfires, disease outbreaks (like Chronic Wasting Disease or Epizootic Hemorrhagic Disease), or sudden changes in animal quotas. Having offline access to this information is critical. Download the regulations PDF and your digital maps (like onX Hunt) to your phone so they are accessible without cell service. This disciplined, three-phase approach is the only way to ensure full compliance and avoid a hunt-ending legal issue.
Why Wild Game Meat Is Superior to Store-Bought Organic Beef?
Beyond the adventure and challenge, one of the most profound rewards of a successful hunt is a freezer full of the highest quality protein on the planet. While “organic, grass-fed” beef is marketed as a premium health product, wild game meat like elk and venison exists in a superior nutritional category. The fundamental difference lies in the animal’s life: a truly wild existence versus any form of managed agriculture. Wild animals have a diverse, natural diet and are constantly moving, which dramatically alters their muscle composition and fat profile.
The most significant advantage is the fat content and quality. Wild game is exceptionally lean. A 100g serving of elk contains less than 2g of fat, compared to 9g in grass-fed beef and 15g in conventional grain-fed beef. More importantly, the type of fat is different. Wild game has a healthier ratio of omega-6 to omega-3 fatty acids. Research from Purdue University found that wild elk and deer have an optimal 2.3:1 omega-6 to omega-3 ratio, which is far superior to the ratios found in domestic livestock and is believed to reduce inflammation. This is a direct result of their natural, varied forage-based diet.
Furthermore, wild game is denser in key micronutrients. It typically contains significantly more iron and B12 than even the best grass-fed beef, essential for energy metabolism and red blood cell production. There are no added hormones, no antibiotics, and no pesticides—it is the original clean meat. This nutritional superiority is the ultimate justification for the hard work of the hunt, providing a tangible, healthy return that connects you directly to your food source in a way that is impossible to replicate from a grocery store.
The nutritional differences between wild game and domesticated beef are not subtle. This direct comparison highlights the clear advantages of meat sourced from a truly wild animal.
| Nutrient (per 100g) | Elk | Venison | Grass-fed Beef | Grain-fed Beef |
|---|---|---|---|---|
| Calories | 146 | 136 | 192 | 250 |
| Protein | 30g | 26g | 26g | 25g |
| Saturated Fat | 0.7g | 1.2g | 3.8g | 6g |
| Iron | 4.5mg | 5mg | 2.6mg | 2.2mg |
| B12 | 3.6mcg | 3.6mcg | 2.5mcg | 2.0mcg |
Key Takeaways
- Layer Your Insurance: A single policy is not enough. You need separate coverage for rescue, medical treatment, and trip cancellation.
- Master Dual Regulations: Comply with both TSA and airline-specific policies for firearms and ammunition to avoid travel disasters.
- Train for the Pack-Out: Your fitness plan must prioritize strength endurance and loaded carries, not just cardiovascular health.
Public Land or Private Ranch: Which Destination Fits Your Skill Level?
Choosing between a do-it-yourself (DIY) public land hunt and a guided private ranch hunt is one of the most fundamental decisions in planning. It is not a question of which is “better,” but rather an honest assessment of which environment aligns with your current skill level, physical ability, and desired experience. The two options demand entirely different skill sets and offer vastly different risk-reward profiles. Mismatching your abilities to the destination is a primary cause of failure and frustration.
Public land hunting is the pinnacle of self-reliance. It demands an expert level of navigational skill, a high degree of physical fitness (an 8/10 minimum), and advanced hunting techniques to deal with pressured animals. The logistical planning is entirely on you, from scouting access points to packing out your own meat. Success rates are typically low, often in the 10-30% range for species like elk. However, the reward is immense: the profound satisfaction of succeeding on your own terms against a truly wild animal in a vast landscape. As demonstrated by public land advocate Randy Newberg, consistent success requires creativity, persistence, and a willingness to work harder than anyone else.
A private ranch hunt, by contrast, trades some of this raw challenge for a higher probability of success. The outfitter handles the vast majority of the logistics, from navigation to field dressing. The animals are typically less pressured and more plentiful, leading to success rates that can exceed 80-90%. This environment is ideal for hunters who are newer to the sport, have physical limitations, or are short on time and want to focus purely on the hunting experience without the immense burden of DIY logistics. The key is to be honest with yourself: do you have the time and ability to master the many skills required for public land, or would your hunt be more successful and enjoyable in a more controlled environment?
This table outlines the stark differences in the skills and expectations required for each type of hunt, providing a clear framework for self-assessment.
| Skill Category | Public Land DIY | Private Ranch Guided |
|---|---|---|
| Physical Fitness | Essential (8/10 minimum) | Moderate (5/10 adequate) |
| Navigation/GPS | Critical – must be expert | Basic – guide handles |
| Calling/Stalking | Advanced techniques needed | Moderate – less pressured animals |
| Logistics Planning | Complete self-sufficiency | Minimal – outfitter provides |
| Success Rate | 10-30% typical | 60-90% typical |
| Trophy Quality | Variable but can be exceptional | Consistent, managed |
A successful hunt is the product of a thousand details handled correctly long before you step onto the mountain. By building your logistical armor with the right insurance, mastering travel and state regulations, and aligning your training and hunt choice with your real abilities, you transform risk into manageable variables. This professional approach is what separates a once-in-a-lifetime experience from a catastrophic failure. Now is the time to apply this framework and start building your own resilient plan.