In summary:
- True field dressing safety is a system, not just a tool. It’s about controlling variables to prevent catastrophic failure.
- Mastering in-field sharpening is non-negotiable and more critical than the initial sharpness of any blade.
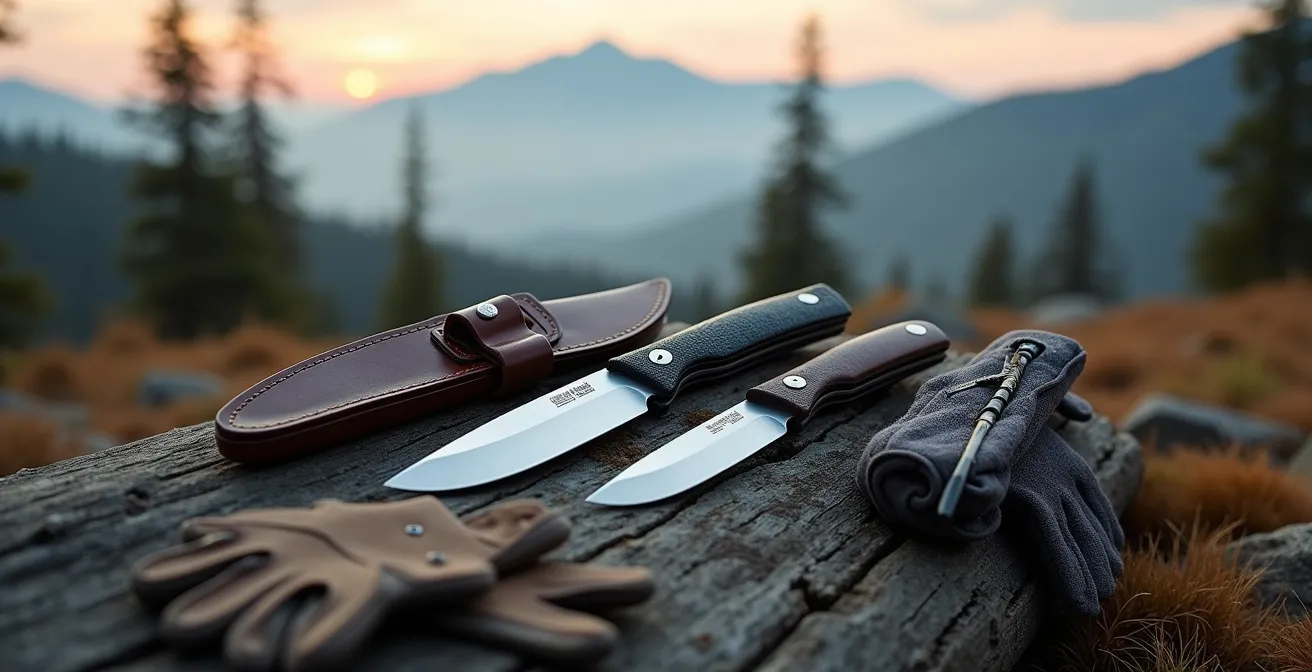
- Blade geometry (like a drop point) and handle texture are your primary defenses against accidental punctures and slips.
- Cross-contamination, especially with CWD prions, is a silent threat that requires specific, scientific cleaning protocols.
- The ideal setup often involves a “Two-Steel System”: a high-retention primary blade and an easy-to-sharpen secondary tool.
For many hunters, the moment after a successful shot is a mix of elation and dread. The work of field dressing, especially deep in the backcountry, is fraught with risk. A slip of the knife can mean a trip to the emergency room or a tainted harvest. The debate between a traditional fixed blade and a modern replaceable edge system often dominates the conversation, but it misses the point. Most articles will tell you “a sharp knife is a safe knife” and leave it at that. They might list different blade shapes or handle materials as if you were choosing accessories.
This approach is dangerously simplistic. The fear of injury or botching the process doesn’t come from owning the “wrong” knife. It comes from a lack of a reliable, repeatable system when you’re cold, tired, and your hands are covered in blood. The real failure points aren’t in the tool, but in the process: a suddenly dull edge that requires excessive force, a grip that fails when wet, or a cleaning error that can have devastating long-term consequences. The difference between a clean, efficient job and a disaster is not about fixed versus replaceable; it’s about control.
This guide will deconstruct the process and provide a framework for system integrity. We will move beyond the superficial and analyze the critical failure points of field dressing. We will explore how to maintain a razor edge with minimal tools, why blade design is crucial for avoiding gut punctures, and the non-negotiable science of CWD prion decontamination. By understanding these principles, you will build a system that makes you safer and more efficient, regardless of the blade you choose to carry.
This article provides a comprehensive look at the key components of a safe field dressing system. The following sections break down everything from blade maintenance and design to contamination control and overall process efficiency.
Summary: Fixed Blade or Replaceable Edge: Which Is Safer for Deep Backcountry Processing?
- How to Restore a Razor Edge in the Field with Minimal Tools?
- Drop Point vs. Clip Point: Which Tip Design Prevents Puncturing the Gut Sack?
- The Cleaning Error That Transfers CWD Prions to Your Next Hunt
- Why Textured Scales Prevent Emergency Room Visits During Field Dressing?
- S30V vs. 1095 Carbon: Which Steel Holds an Edge Through an Entire Moose?
- How to Cool Down Meat Quickly When Temperatures Exceed 70°F?
- Knife or Multi-tool: Which Is Truly Indispensable for the Solo Hunter?
- How to Process an Entire Animal in the Field Without Spoilage?
How to Restore a Razor Edge in the Field with Minimal Tools?
The single greatest factor in field dressing injuries is not the knife, but the force applied. A dull blade requires dangerous amounts of pressure, which leads to uncontrolled slips when the edge finally bites or gives way. The promise of a replaceable blade is a “factory sharp” edge every time, but this can create a dependency. A true woodsman knows how to maintain their edge, anywhere. The ability to restore a working edge quickly is the cornerstone of energy management and safety. A few light, controlled strokes are always safer than one forceful, desperate push. It’s not about achieving a shaving-sharp mirror polish in the field; it’s about re-establishing a functional, toothy edge that cuts with minimal effort.
A lightweight ceramic rod or a small diamond stone should be as essential to your kit as the knife itself. With practice, you can turn a rolled or dull edge back into a highly efficient cutting tool in moments. According to some expert users, it’s possible that experienced users can restore a working edge in literally seconds with a ceramic hone, a critical skill when time is of the essence. The key is to address edge degradation before it becomes a significant problem, using a triage approach based on the level of dullness.
Field Sharpening Triage: A 3-Step System
- Slightly Dull Edge (Stropping): The blade is still sharp but could be better. Use the leather of your belt, a canvas backpack strap, or even the cardboard from an ammo box. Perform 20-30 edge-trailing strokes (pulling the blade away from the edge) per side. This realigns a microscopic rolled edge without removing steel.
- Visibly Rolled Edge (Ceramic Rod): You can see or feel a slight burr or roll on the edge. Use a ceramic rod, applying very light, feather-like pressure at a consistent 20-degree angle. Five to ten alternating strokes per side are usually enough to create a fresh micro-bevel and restore a keen cutting ability.
- Nicked or Damaged Edge (Diamond Stone): For significant damage, a more aggressive approach is needed. Start with a medium-grit (e.g., 600) diamond stone to remove nicks and re-profile the edge. Progress to a finer grit (e.g., 800-1200) to refine it, and finish with a few stropping strokes to clean up the apex. This is a repair, not just a touch-up.
Forgetting this fundamental skill creates a critical failure point in your system. Relying solely on blade replacement means you have no backup when you run out of blades or a blade snaps in a difficult joint.
Drop Point vs. Clip Point: Which Tip Design Prevents Puncturing the Gut Sack?
When making the initial long incision to open the body cavity, the tip of your knife is operating blind just beneath the skin and muscle wall. This is one of the most high-risk moments for meat contamination. A slip of an inch can puncture the gut sack or intestines, spilling digestive contents and bacteria all over the precious tenderloins and backstraps. The design of your blade’s tip is your primary defense against this common and disastrous error. While many shapes exist, the comparison between a drop point and a clip point highlights the importance of ergonomic leverage in blade design.
The key is the relationship between the tip of the knife and the spine. A design that keeps the sharp point out of the way during slicing motions is inherently safer for this specific task.
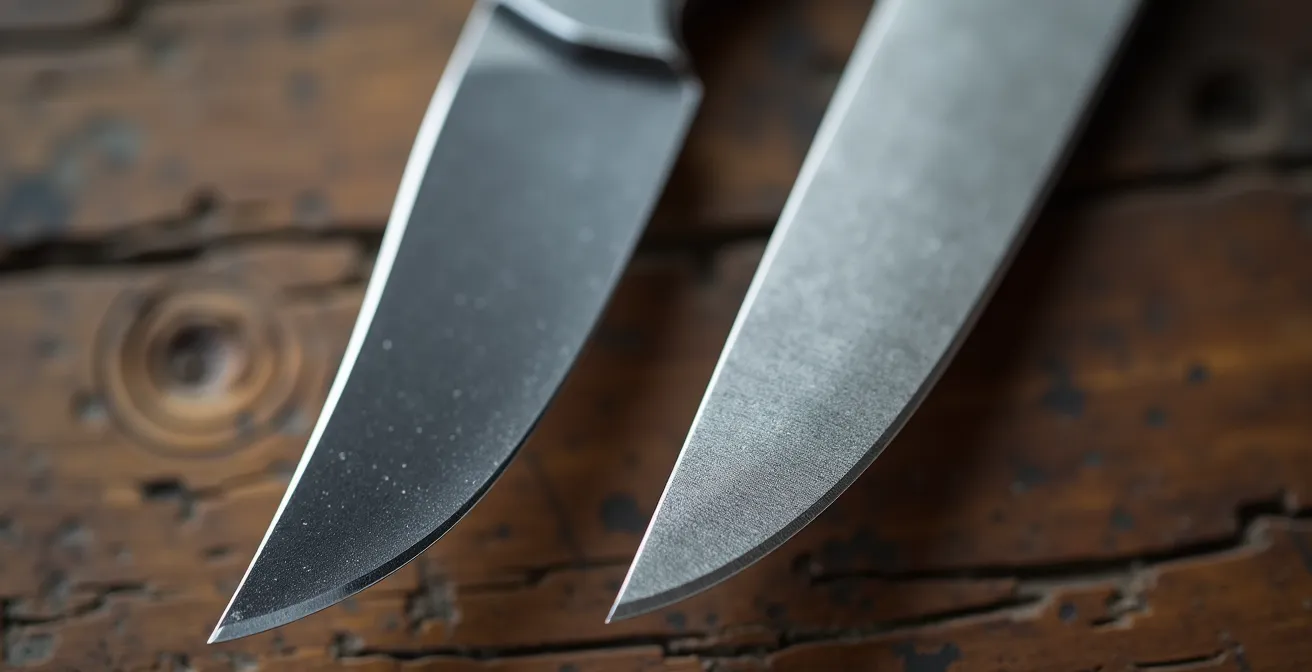
As the image clearly shows, the drop point design features a convex curve, where the spine of the blade gently slopes down to meet the tip. This geometry naturally keeps the sharp point shielded and forces the cutting action onto the “belly” of the blade. When you slide the knife under the hide, the dull spine rides against the viscera while the belly does the slicing, dramatically reducing the risk of an accidental puncture. In contrast, the clip point features a concave or straight cutout, resulting in a much finer, more aggressive, and often elevated point. While excellent for precision piercing or detail work, this design requires conscious effort to keep the tip from snagging or puncturing during the initial opening cut.
While a gut hook can also be effective, it’s a specialized tool that can clog with hair and fat. For an all-purpose field knife, a well-designed drop point offers the best balance of utility and built-in safety for the most delicate part of the process.
The Cleaning Error That Transfers CWD Prions to Your Next Hunt
Beyond immediate physical injury, the most significant threat in field dressing is microscopic. Chronic Wasting Disease (CWD), a fatal neurological disease affecting deer, elk, and moose, is caused by abnormal proteins called prions. These are not bacteria or viruses; they are incredibly resilient, able to persist in the environment for years and withstand traditional cleaning methods. The most common vector for transferring these prions from a harvested animal to your equipment—and potentially to your next hunt—is improper cleaning. This goes far beyond a simple rinse and wipe; it requires a specific protocol for microbial control.
Standard soap and water are ineffective against prions. The only proven, accessible method for hunters to decontaminate their tools is a specific bleach solution. Research is definitive on this point; a study from the National Institutes of Health (NIH) showed that a 40% solution of household bleach for 5 minutes is required to effectively inactivate CWD prions on stainless steel surfaces. This is not a suggestion; it is a scientific necessity for any hunter operating in a CWD zone.
CDC Study on CWD Contamination During Venison Processing
To understand the real-world risk, CDC researchers tested equipment after it was used to process a CWD-positive deer. Their findings, published in the journal Emerging Infectious Diseases, were alarming. Standard cleaning with dish soap completely failed to remove prions from common polyethylene cutting boards. While a 40% bleach solution did decontaminate stainless steel knives, the study identified a critical failure point in modern gear: the complex crevices inside replaceable blade holders. These areas were found to trap nervous system tissue, making them exceptionally difficult to decontaminate and a potential source of cross-contamination for future use.
This highlights a significant drawback of some replaceable blade designs. While the blade itself is disposable, the handle and holder can become a permanent reservoir of contamination if not meticulously decontaminated using the correct, scientifically-validated methods.
Why Textured Scales Prevent Emergency Room Visits During Field Dressing?
Your control over a razor-sharp blade is only as good as your grip. In the real world of field dressing, your hands will be cold, wet, and slippery with blood and fat. This is the environment where a catastrophic failure of grip is most likely. A smooth, beautiful handle made of polished wood or bone might look great in a display case, but in the field, it becomes a liability. The texture of your knife’s handle—its scales—is a primary safety feature, not an aesthetic choice. Choosing a material that maintains or even improves its grip when wet is a critical part of preventing the kind of slip that ends a hunt and starts a hospital visit.
Different materials perform differently under these harsh conditions. The goal is to find a material that provides positive traction and resists absorbing fluids, ensuring your hand stays locked in place even when applying pressure during tough cuts through joints or thick hide. Your choice of handle material directly impacts the ergonomic leverage you can safely apply.
Consider the performance of these common synthetic handle materials in wet conditions:
- Micarta: A composite of linen, canvas, or paper and resin. Its grip is excellent and, counter-intuitively, often feels “grippier” when it becomes saturated with water or blood, as the fibers of the fabric swell slightly and provide more texture.
- G10: A fiberglass laminate that is virtually impervious to fluids and temperature changes. The grip comes from the aggressive texture machined into its surface. It won’t absorb blood and is easy to clean, making it arguably the best all-around choice for a hard-use hunting knife.
- Textured Rubber/Santoprene: These materials offer a softer, more cushioned grip that is superb in cold weather (below 32°F / 0°C) and reduces hand fatigue during long processing sessions. The non-slip texture is excellent even when bloody.
Ultimately, a handle that allows for a confident, non-slip grip enables you to use less force, maintain better control, and work with greater precision. It is a fundamental component of your safety system.
S30V vs. 1095 Carbon: Which Steel Holds an Edge Through an Entire Moose?
The heart of any cutting tool is its steel. The debate between modern stainless “super steels” and traditional high-carbon steels is often framed around corrosion resistance. For a hunter, the more practical question is about performance during a long, demanding task: which steel will stay sharp enough to break down an entire large animal, and which is easier to maintain in the field? This isn’t a simple “good vs. bad” comparison; it’s a trade-off between two different philosophies of system integrity: maximum edge retention versus maximum field serviceability.
Modern powder metallurgy stainless steels like S30V, S35VN, or MagnaCut are engineered for incredible wear resistance. They can hold a working edge through an astonishing amount of work. High-carbon steels like 1095 are tougher (less prone to chipping) and significantly easier to re-sharpen, but they will lose their initial keen edge more quickly and require more frequent touch-ups. Neither is inherently superior; they simply serve different roles in a well-planned system.
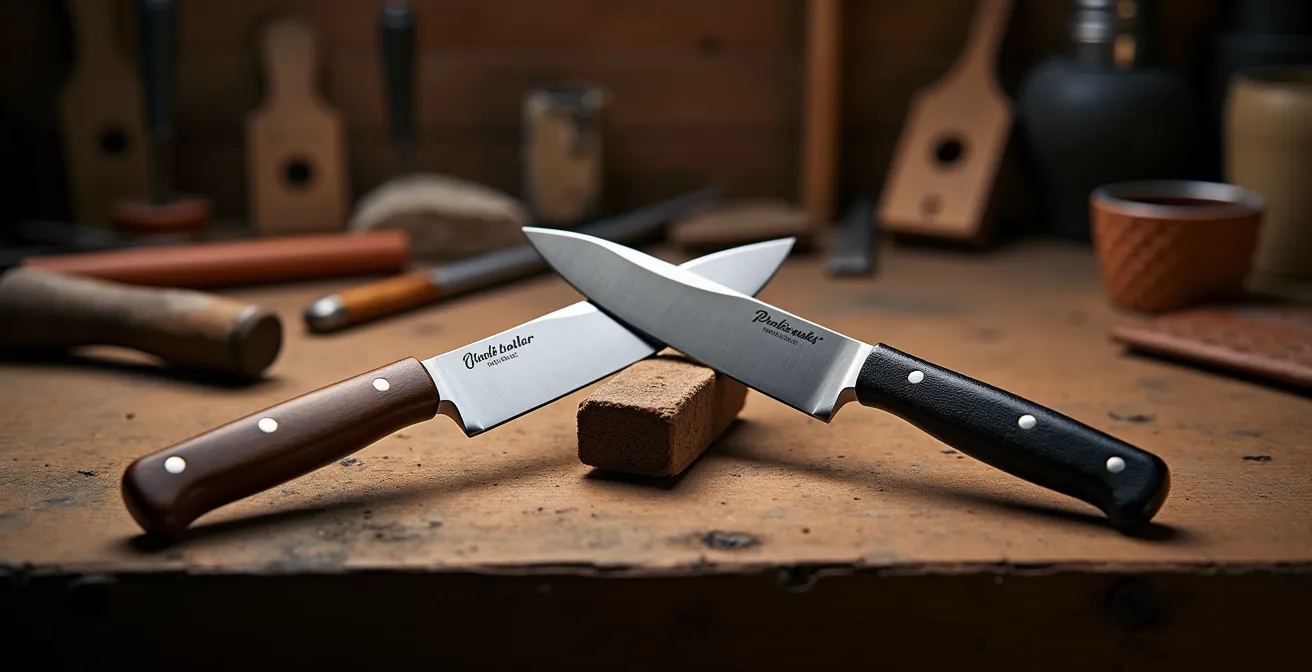
The visual difference between a high-tech stainless blade and a traditional carbon steel blade often reflects their use. The stainless steel remains pristine, shrugging off wear, while the carbon steel develops a patina, a story of its work. This visual distinction hints at their differing maintenance needs—one requires very little attention during the task, while the other is designed for easy and frequent care.
Field Performance: The Two-Steel System
Field tests by professional hunting guides in Montana revealed a practical solution to this debate. In a review by Field & Stream, guides found that high-end stainless steels like MagnaCut could get through an entire elk without needing a touch-up. In contrast, a 1095 carbon steel blade required sharpening mid-task but, critically, was restored to a razor edge with a ceramic rod in under 60 seconds. This led to the adoption of an optimal “Two-Steel System”: a primary skinning knife in a high-retention stainless steel (like S30V) for the long, clean cuts, paired with a tougher, easy-to-sharpen carbon steel knife or multi-tool for rough work around bones and joints where edge damage is more likely.
Instead of searching for one “perfect” steel, the expert hunter builds a system where each tool is optimized for its specific role, balancing edge retention with ease of maintenance.
How to Cool Down Meat Quickly When Temperatures Exceed 70°F?
You can do everything else right—a perfect shot, a clean field dressing job—and still lose the entire harvest to one simple enemy: heat. Bacterial growth accelerates dramatically in warm weather, and the thick hide and body mass of a large game animal act as a powerful insulator. Getting the meat cooled down is not just a priority; it is a race against the clock. The moment the ambient temperature rises, your entire approach to field processing must change to focus on rapid cooling. This is a critical failure point that can lead to sour, spoiled meat.
The danger zone for bacterial growth begins to skyrocket once the meat is exposed to warm air. According to meat safety experts, temperatures exceeding 70°F (21°C) accelerate bacterial growth, requiring immediate and aggressive cooling protocols. The single most important factor is removing the hide, which traps an immense amount of heat. From there, a series of simple but effective steps can mean the difference between a cooler full of pristine venison and a tragic waste.
Here are the essential heat-defeating hacks for rapid meat cooling in the field:
- Remove the hide immediately. This is the number one priority. It’s the animal’s natural insulation, and its removal allows heat to dissipate rapidly.
- Use the Gutless Method. If possible, avoid opening the main body cavity. The gutless method allows you to remove all four quarters, the backstraps, and tenderloins without releasing the massive heat source of the gut pile.
- Elevate for Airflow. Never lay quarters directly on the ground. Place them on elevated logs, branches, or a clean tarp to allow for 360-degree air circulation.
- Use Shade and Breeze. Position the meat on the shady side of a hill or under tree cover. Orient the quarters to catch any prevailing breeze.
- Use Breathable Game Bags. High-quality, breathable game bags are essential. They keep flies off while allowing moisture and heat to escape. Never use plastic bags or tarps, which trap heat and moisture, creating a perfect incubator for bacteria.
- Seal Before Stream Cooling. If you use a cold stream to cool meat, you must seal the quarters in completely waterproof dry bags first. Direct contact with water can contaminate the meat.
In warm weather, speed and airflow are your best allies. Every minute the hide stays on is a minute lost in the fight against spoilage.
Knife or Multi-tool: Which Is Truly Indispensable for the Solo Hunter?
The debate over essential gear for a solo hunter often centers on the primary knife. However, focusing solely on the cutting blade overlooks a host of other problems that can arise in the backcountry. While a dedicated knife is a specialized “scalpel” for meat processing, a high-quality multi-tool is a compact “toolbox” designed for problem-solving. For the solo hunter, who has no backup, the value of a multi-tool often extends far beyond its small, integrated blade. Its true indispensability comes from its ability to solve problems that a simple knife cannot.
From repairing a piece of gear to emergency first aid, the components of a multi-tool are designed for versatility. But for field dressing specifically, one tool stands out as a game-changer, especially for users of replaceable-blade knives. As field testers for Outdoor Life noted:
Using the pliers is the safest and most effective way to change a snapped or dull replaceable blade, especially with cold, bloody hands.
– Field Testing Team, Outdoor Life – Field Dressing Equipment Review
This single function can prevent a serious cut when fumbling with a tiny, razor-sharp blade in difficult conditions. The pliers provide the secure grip and control that your cold fingers lack. Beyond this, a multi-tool’s other components provide critical support for the entire field dressing system.
This table, based on an analysis from Free Range American, breaks down the distinct roles these tools play for a solo hunter. A dedicated knife is a superior cutting tool, but a multi-tool offers unparalleled emergency and support value. The data clearly shows they are not interchangeable; they are complementary parts of a robust system.
| Tool Type | Primary Function | Emergency Value | Weight Penalty |
|---|---|---|---|
| Fixed/Replaceable Blade | Meat processing ‘scalpel’ | Limited | 2-5 oz |
| Multi-tool with Pliers | Problem solver & blade changer | High – repairs, first aid | 6-9 oz |
| Multi-tool Bone Saw | Sternum/pelvis cutting | Saves primary blade edge | Included in multi-tool |
| Multi-tool File | Emergency edge repair | Fixes rolled edges | Included in multi-tool |
For the solo hunter, a multi-tool isn’t just a backup knife; it’s a force multiplier. Its saw saves your primary blade’s edge from bone, its file can perform emergency edge repairs, and its pliers make the entire system safer.
Key takeaways
- System over tool: Your safety depends on a repeatable process for managing your edge, grip, and contamination, not on a single piece of gear.
- Mastery of maintenance: The ability to quickly restore a working edge in the field with a simple ceramic rod or strop is more valuable than any factory-sharp blade.
- Control is everything: Blade geometry that prevents punctures, handle texture that grips when wet, and techniques that minimize force are the pillars of injury prevention.
How to Process an Entire Animal in the Field Without Spoilage?
Bringing all these elements together—edge maintenance, blade selection, contamination control, and tool choice—allows you to build a complete, repeatable system for processing an animal from start to finish. The goal is system integrity, where each step logically follows the last, minimizing risk and maximizing the quality of the harvest. A haphazard approach, where clean and dirty tasks are mixed, is a recipe for spoilage and cross-contamination. A systematic workflow ensures that from the first cut to the last, you are in control of the process.
This is not an abstract theory. Agricultural extensions have developed these systems to help professional processors reduce waste and ensure meat safety. These principles are even more critical in the uncontrolled environment of the field.
Contamination Control Cascade for Field Processing
Michigan State University Extension developed a systematic cascade for hunters and processors to prevent meat spoilage and the spread of disease like CWD. The process is designed to work from “clean” to “dirty” to prevent cross-contamination. The core steps are: 1) Skin the animal first with a clean, designated knife. 2) Remove the quarters, backstraps, and tenderloins without puncturing or touching the gut material. 3) Any meat that is accidentally contaminated (e.g., near a gut puncture) must be physically segregated from the clean quarters. 4) The head and central nervous system (CNS) tissue, where CWD prions are concentrated, should be handled last, ideally with a separate, designated tool that can be thoroughly decontaminated or disposed of.
Adopting this cascade method transforms field dressing from a chaotic chore into a controlled, manufacturing-like process. To ensure you are consistently following best practices, an audit of your personal process is essential.
Your 5-Point Field Processing Safety Audit
- Tool Readiness: Before the first cut, is your primary blade razor-sharp? Is your field sharpening kit (strop, ceramic rod) immediately accessible? Are your designated “clean” and “dirty/bone” tools laid out separately?
- Contamination Barriers: Do you have clean, breathable game bags ready? Is a tarp or clean surface prepared to keep meat off the ground? Are your bleach solution or decontamination wipes ready for post-job cleanup?
- Workflow Sequence: Have you mentally rehearsed the Contamination Control Cascade? Skin first, then remove clean meat (quarters, backstraps). The gut cavity and CNS tissue are handled last.
- Grip & Control Check: Are you wearing gloves that provide good grip? Does your knife handle provide positive texture, even when wet? Are you consciously using minimal force, letting the blade do the work?
- Post-Processing Protocol: Once the meat is bagged and cooling, is your decontamination process for tools and surfaces immediate and thorough? Are knives being cleaned according to CWD protocols if applicable?
–
By treating field dressing as a systematic process with clear, repeatable steps, you eliminate the variables that lead to fear and failure. You replace anxiety with confidence, ensuring that every successful hunt results in a safe, clean, and well-preserved harvest.